 Even adults with plenty of experience dislike public speaking; we can hardly expect our students to feel differently. This pod contains many ideas for helping students to improve their public speaking skills. The activities within would work very well spread out into different sessions, as this would give students plenty of time to practice and prepare before their final project. Download Pod.
Topics in this Pod
- Presentation skills
- Tools for preparing for public speaking
Essential Questions
- What do the best public speakers do to improve their performance?
- How does knowing my audience influence my presentation?
Vocabulary
- Tone: the type of words or way of speaking; changes depending on setting and audience
- Projection: a way of speaking with appropriate volume and clarity so that your audience understands you
- Extemporaneous: off the cuff or without practice
Activities
Public Speaking Skills. In this activity, students will learn several strategies for engaging their audience, including how to structure their presentation, strategies for good visuals, and best practices for public speaking. See More.
Warm-ups 1. In this activity, students learn strategies for warming up their voices and bodies before presentations, as well as tools to control their anxiety. See More.
Warm-ups 2. This activity is a slightly more elaborate warm-up that would be useful at the beginning of the presentation day or as a way to jump start your students’ presentation practice. See More.
Speaking Practice Games 1. Students will practice extemporaneous speaking in this activity, helping them to be more comfortable speaking without the use of notecards or Powerpoint slides. See More.
Speaking Practice Games 2. Students will practice extemporaneous speaking in this activity, helping them to be more comfortable speaking without the use of notecards or PowerPoint slides. See More.
Project Planning. In this activity, students will create a reminder card of the public speaking strategies they want to remember. They will also begin outlining their presentation. See More.
Goals
At the end of the pod, students will be able to:
- Present their topic and their research in a way that their audience can understand.
AASL Standards
3.1.3 Use writing and speaking skills to communicate new understandings effectively.
4.1.8 Use creative and artistic formats to express personal learning.
Public Speaking Skills.
- Introduce the lesson by asking students if they’ve ever seen a really good speech or performance. After they have answered, follow up by asking what made the speech or performance so good. Begin making a list on chart paper of things that improve presentations.
- Ask students if they have ever made a visual to go along with a speech. If they have, ask how they decided what to put on the visual. Emphasize that the visual is there to aid the audience in understanding, but if it has too many words, it will detract from the speaker.
- Put “Visual aids with few words” on the chart paper list.
- Tell students that speakers often tell stories to engage the audience and emphasize their point. Ask students how this might work with the topic we’ve been discussing as a group – alzheimers. What stories might engage your audience?
- Write “Add a story to your presentation” on your chart paper.
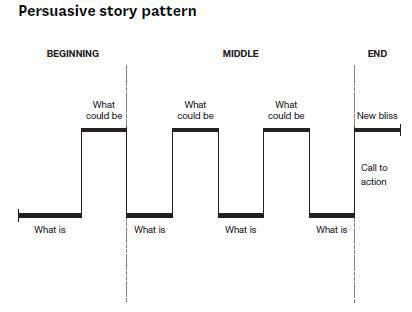
- Consider using a persuasive story pattern, letting your audience get comfortable by relating knowledge they might know, but then introducing new facts. Continue this pattern for the beginning, the middle, and then add the end, include what actions should be taken. Show students this visual:
- Add “Tell your audience what is and then what could be” to the chart paper.
- Introduce students to the three “nos” for public speaking: No apology, no rambling, and no reading their speech. Add these to your chart paper and then ask students how you could avoid these practices.

Rister, A. (2011). 3 no-nos for speech intros. Creating Communication, Sept 18. Blog. Available: http://alexrister1.wordpress.com/2011/09/18/advice-3-no-nos-for-speech-intros/
Warm-ups 1.
- Sing scales to warm up your voice. You also might try familiar songs.
- Do light stretches to warm up your voice. These might include touching your toes, stretching your arms to the sky, and/or gently rolling your neck to work out tension.
- Take three deep breaths to control your breathing. Make sure your breath comes from the stomach – it should expand out when you breathe in and compress inward when you breathe out.
- Claim your spot on the stage by deciding with purpose where you want to be present on the “stage.” Plant your feet and smile.
Warm-ups 2.
- Introduce a well-known tongue twister to your students, such as “Sally sells seashells by the seashore.”
- Divide your class into groups of 4 – three speakers and one conductor.
- Instruct the speakers to say the tongue twister in the manner provided by the conductor. For example, the conductor can tell them to say it louder, faster, slower, or backwards.
- Allow the students to rotate so that all students have a turn as the conductor.
Speaking Practice Games 1.
- Print cards with common nouns (book, computer, taco, shirt, sky, school, etc) on them.
- During the activity, ask students to pull two of the cards from your stack.
- The student then needs to tell a story that connects the two words in a way that makes sense. The story should not be long.
Speaking Practice Games 2.
- Prepare a list of clichés that can be used as endings to a short story. Examples might include: “Just Do It,” “I’m Lovin’ It,” “That was easy,” “The early bird gets the worm.”
- Tell each student to create a 2-minute story ending with the line they’ve been given and instruct them to present this story to the class.
- As students are speaking, the rest of the group should come up with three images they would use to show the story on a Powerpoint. Ask one or two students to share their images when the speaker is finished.
Project Planning.
- Have students write down 3-5 public speaking strategies they want to remember on a notecard.
- Then, have students outline their speech. Remind students to consider how they want to introduce their topic, the main points they have identified that their audience needs to know, and an ending that summarizes the key points and includes a call to action from their audience.
Summarized from Hanafi, N. (2014). The presentation planning checklist. We Are Visual. Available: http://www.slideshare.net/NadineHanafi/the-presentation-planning-checklist-by-we-are-visual
